| Subsystems
The Problem
In large applications, managing the
many hundreds or even thousands of various components can become a
difficult task. This task is made even more complicated with the
introduction of the assembly workbench, in which the links between
various components can be examined and manipulated.
The Solution
New in UNIFACE 7.2.04 are component
subsystems, which can be used to logically group components in the
same way an application model is used to group entities. When a
component is created, it is automatically added to UNIFACE’s
"Default" subsystem. If the component is required in a
different subsystem, it must be moved manually (explained later).
Grouping components into subsystems has the following benefits;
- The system can be separated into
logical groups, for example, Customer-related components,
Invoice-related components etc. For systems that limit the
length of component names (e.g., 8 characters for Windows 3.1
applications), this can be useful in determining the component’s
purpose of behaviour.
- When exporting components, it may be
necessary to only export components concerned with a particular
area of the application (e.g, all components used for the
"Invoicing" part of the application). Although naming
conventions can sometimes be used to overcome this problem, it
is not always the case. In UNIFACE 7.2.04, the export screen
allows components to be exported either by name or by subsystem,
thus allowing a set of logically grouped components to be
exported together.
- If version control is being used,
logically grouped subsystems can be utilised to speed up the
process.
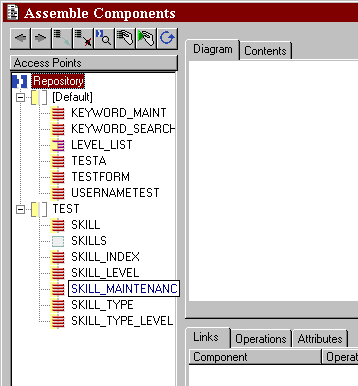
- Within the Assembly Workbench,
components are automatically listed in a tree structure
according to their respective subsystem. By grouping components,
the manipulation of objects within the workbench becomes more
manageable.
Adding components to
subsystems
There are two ways to move components
from one subsystem to another (or from the default subsystem to a
named subsystem).
Assembly Workbench
- The Assembly Workbench contains a
"Subsystem" menu, providing facilities for the
addition, deletion and maintenance of subsystems, and for the
moving of components from one subsystem to another;
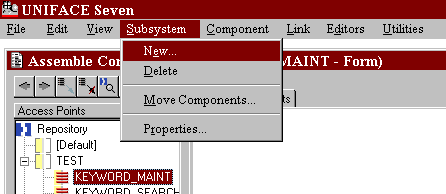
- "New" brings up a screen
allowing the name for a new subsystem to be entered. Once
created, components can be moved to this subsystem.
- "Delete" will attempt to
delete the current subsystem; in the example shown above, this
would mean the subsystem "Test" would be deleted. This
action will fail if the subsystem contains components.
- "Properties" will bring up
a screen allowing a description to be entered for the current
subsystem (Note: this description field is not available from
the "New" screen).
- "Move Components" brings
up the following screen;
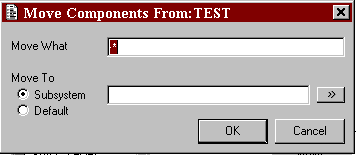
- From this screen, a component name,
or component name profile can be entered and moved to the named
subsystem. In the example, below, all components beginning with
"Skill" will be moved to the subsystem
"Test".
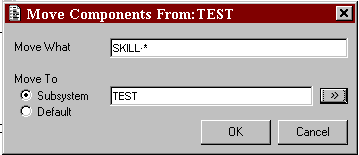
- This results in the following change
to the Tree Window;
Global Update -
Signatures
The Global Update screen for signatures
has an update property allowing components to be moved from one
component to another. This is achieved as follows;
- As with all other Global Update
screens, a profile must first be set to retrieve the required
objects. Once the profile has been entered, the screen will look
as follows (in this case, a profile of "Skill*" was
entered for the component’s name);
|
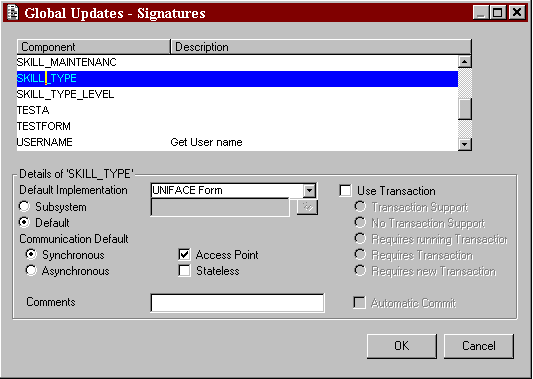
This screen lists certain
properties for the currently highlighted component. In the
screen above, component "SKILL_TYPE" belongs to
the "Default" Subsystem.
|
-
The "File"
menu contains an option for "Set Property Update".
Selecting this option produces the following screen;
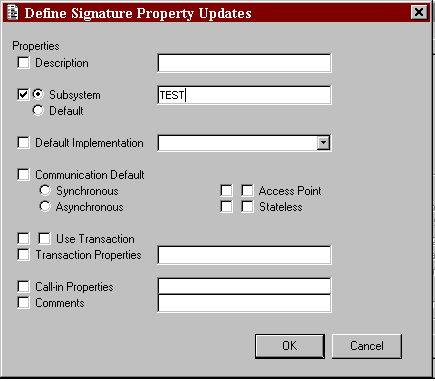
-
In this screen, a new
"Subsystem" can be entered (in the example above, a
subsystem "Test" has been entered). Pressing
"OK" produces a dialogue box requesting user
confirmation. Upon confirmation, the update will be performed.
The update from the example above produces the following screen:
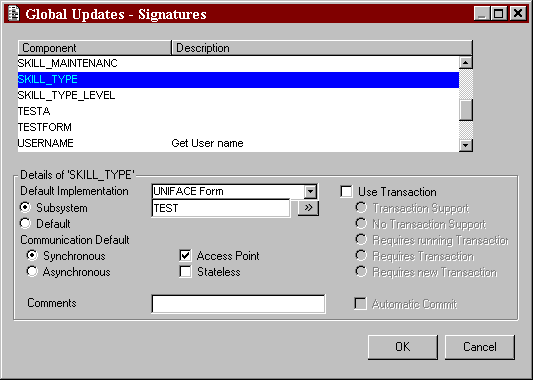
-
This shows that the
component SKILL_TYPE (and all other components beginning with
the word "SKILL") now belongs to the "TEST"
subsystem.
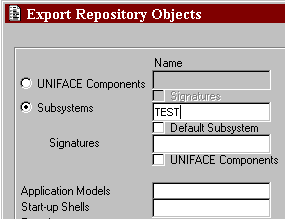
Exporting
Using Subsystems
The example below shows a
section of the UNIFACE 7.2.04 Export Screen. In this example, the
developer has chosen to export all components from within the
"TEST" subsystem. Clicking the "Default"
checkbox will allow all components in UNIFACE’s
"Default" subsystem to be exported.
Rules
The following rules apply
to subsystems:
- Each subsystem must have a unique
name within the repository.
- The subsystem’s length can be a
maximum of 16 characters.
- The "default" subsystem
cannot be deleted.
- A component can only exist within
one subsystem.
- Nesting of subsystems (i.e., a
subsystem within a subsystem) is not allowed.
- All new components, and components
migrated from previous UNIFACE versions are automatically
included in the "Default" library.

|