Using
UD6/CMtool Driver and Uniface with ClearCase
ClearCase (formerly known as Pure Atria) was declared the
most popular Software Configuration Management tool in the
market in August 1999 by IDC, for the 3rd year running.
ClearCase is popular with many unix variants and Windows
solutions available, including solutions for development
in remote geographical locations. It offers process control,
version control, release / build management, software distribution,
and integration with the ClearQuest change management tool.
The home of ClearCase on the web is http://www.rational.com/clearcase
A complete list of configuration management tools can be
found at http://www.iac.honeywell.com/Pub/Tech/CM/CMTools.html
If you have not already done so, please read A
methodology to Uniface source code control before you
continue with these topics and examples.
Using UD6 with ClearCase
Since UD6 supplies Uniface source code to ClearCase in industry
standard text files (in XML format), all of the advanced
ClearCase features can be used. These include, UCM, MultiSite
and ClearQuest.
The way that UD6/CMtool Driver works with your Uniface source
code is independent of whether you are using Dynamic Views
or Snapshot Views. Snapshot views allow developers in remote
geographical locations to work on projects and then integrate
their code changes with the original.
UD6/CMtool Driver is the only CM/SCM solution for Uniface
that allows this level of functionality.
What to Version Control
If you are using ClearCase, March Hare advise that you use
its capacity to manage all files associated with a Uniface
development environment, both source objects and derived
objects (like .frm, .svc, .prt and .dol files).
This manual only describes the process of setting up ClearCase
and UD6/CMtool Driver for versioning your Uniface source
code, since that is the unique ability of the UD6/CMtool
Driver software. To version derived objects, please refer
to the extensive documentation that Rational supply with
ClearCase.
Issues with MVFS
March Hare recommend that users of ClearCase follow Rational's
guidelines for Case Sensitivity as described in the Clear
Case Administration Manual Section 5.2.
ClearCase & UD6 guide
| Next > |
- |
Configuration
Information |
| |
- |
Taking
Control in ClearCase |
| |
- |
Releasing
a form using ClearCase |
| |
- |
Checking
a form in using ClearCase |
| |
- |
Adding
a form using ClearCase |
| |
- |
Finding
the difference in versions using ClearCase |
| |
- |
Problems
when using ClearCase |
Configuration
Information
In
Windows installations of ClearCase either one or more physical
computers act as Servers for various ClearCase objects, e.g.:
VOB's, Views, Licenses etc. ClearCase Attaché clients
can use these servers to interact with and update the source
code stored within ClearCase. These examples are all using
the ClearCase evaluation license on a Windows NT workstation.
In this configuration, all ClearCase servers run on a single
machine.
Here is a quick overview of the steps to installing and running
Uniface with ClearCase using UD6/CMtool Driver. Each step
is explained in more detail if you click on the links that
are provided.
-
Install Uniface and UD6/CMtool Driver on to the NT Workstation.
-
Alter the usys.ini and usys.asn files as per the Guide
to Installing UD6/CMtool driver.
-
Alter the usys.asn file to have
a 'catchall' to direct all non-joined source code to the
.\sources\other directory, set the $MAXFILES and set temporary
files to be stored in another database.
-
Start and then close the IDF to initialise an empty repository.
(For the purposes of this demonstration,
the default directory of the shortcut used to start the
IDF should be a temporary directory for loading your existing
source code into the XML format that the UD6/CMtool Driver
uses (we used c:\cc).
The file c:\cc\sources\other\udicver.xml now exists,
and contains 1 record.
-
Add the 'nokeycheck' parameter to the USYS$UD6_PARAMS setting
in the usys.asn file (this setting improves the performance
of the UD6 driver for bulk load operations, but must be
disabled for normal use).
-
Load the repository from a backup with a command like:
                      idf /com=100 /cpy trx:7204bkp07Feb2000.trx
                      idf:
(some unix environments may require the /com=10 switch to
reduce the number of file handles used).
- Alter
the usys.asn file to remove the 'nokeycheck' parameter.
-
Prior to controlling your source in ClearCase, it is wise
to compile all objects and forms, e.g.:
idf.exe /all
This ensures that all the descriptors have been generated
for the forms. Without this information you will not be
able to compile forms in the CM tool since they will be
read-only and the descriptors cannot be generated (see the
nodeny parameter in the USYS$UD6_PARAMS help topic).
- For
the same reasons you may wish to start up the IDF and select
the Assembly Area, then the Assembly Workbench.
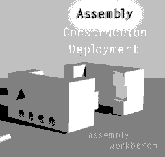
Clicking on this ICON will start the initial synchronisation
of signatures and diagram.

Configuration files
| |
- |
usys.asn
file |
| |
- |
Joins
file |
ClearCase
& UD6 Guide
| |
- |
Overview
|
| |
- |
Configuration
Information |
| Next > |
- |
Taking
Control in ClearCase |
| |
- |
Releasing
a form using ClearCase |
| |
- |
Checking
a form in using ClearCase |
| |
- |
Adding
a form using ClearCase |
| |
- |
Finding
the difference in versions using ClearCase |
| |
- |
Problems
when using ClearCase |
Taking
Control in ClearCase
As a way of introducing ClearCase, we'll go through a typical
work-session using it.
At this point your source code is now in XML the format that
the UD6/CMtool Driver uses (in the directory c:\cc\sources),
and is ready for 'putting into' ClearCase. The following describes
a ClearCase setup which is a fairly straightforward one and
should suffice for your initial evaluation, or to give more
advanced ClearCase users an insight into the specifics of
using ClearCase with the UD6/CMtool Driver for Uniface.
Before anything else is done, your Uniface source code has
to be converted to ClearCase import format.
Copy the XML directory tree to ClearCase import format.
To copy the directory tree c:\cc\sources to ClearCase import
format, the ClearCase tool clearexport_ffile is used:
C:\> |
cd
\cc\sources |
C:\cc\sources> |
clearexport_ffile
                        -r templates globals applications components glyphs menus
other registers relationships sub-types tables |
Installing and setting up ClearCase.
It is not necessary to create a baseline since ClearCase automatically
creates an INITIAL baseline when the VOB is converted to a
UCM Component in the final step.
Taking Control
| Next > |
- |
Case
Insensitive MVFS |
| |
- |
Create
a project VOB |
| |
- |
Create
a component |
| |
- |
Create
a project |
ClearCase
& UD6 Guide
| |
- |
Overview
|
| |
- |
Configuration
Information |
| |
- |
Taking
Control in ClearCase |
| |
- |
Releasing
a form using ClearCase |
| |
- |
Checking
a form in using ClearCase |
| |
- |
Adding
a form using ClearCase |
| |
- |
Finding
the difference in versions using ClearCase |
| |
- |
Problems
when using ClearCase |
Set
ClearCase to Case Insensitive MVFS
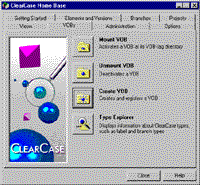
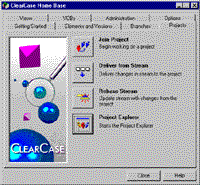
Using the ClearCase Home Base tool, select the Administration
property sheet:
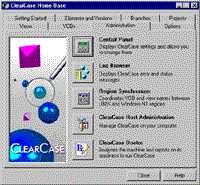
Press Control Panel
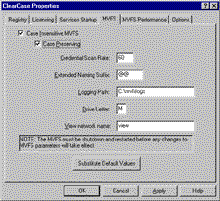
Check that both the Case Insensitive and Preserve Case check
boxes are on (as shown).
Taking
Control
| |
- |
Case
Insensitive MVFS |
| Next > |
- |
Create
a project VOB |
| |
- |
Create
a component |
| |
- |
Create
a project |
Create
a project VOB
A Project VOB is a VOB which contains the information necessary
for using Unified Change Management. You may use base ClearCase
instead with UD6/CMtool Driver and Uniface, however it is
not described here.
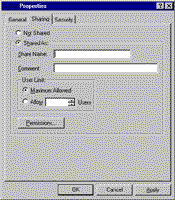
Create a Windows NT directory share
Log on to the VOB host and create, and then share (standard
Windows NT share) a directory called pvob. In our example
we have used c:\pvob, with a share name of \\ntwkst01\pvob.
Creating a Versioned Object Base
Follow the instructions in the Rational ClearCase Administration
Manual (10.3) for creating a VOB. A general overview is given
here.
Choose a VOB-tag, we used the name '\pvob'.
Create the VOB, using cleartool or a GUI tool like Clear Case
Home Base, e.g.:
Press Create VOB

Enter these details:
Name: PVOB
Create VOB as UCM component: No
Description Unified Change Management database This VOB will
also store: UCM Project Data (Yes)
Press Next.
Select a storage location (the default was used in our example).
Set the Administrative VOB to --- none ---, then press Finish.
| |
VOB
Tag Information:
Tag name: PVOB
Region name: evaluation_region
Comment: Unified Change Management database
VOB Storage Information:
VOB storage location: \\ntwkst01\ccstg_c\VOBs\PVOB.vbs
Features:
+No administration VOB will be associated
with this VOB
+WILL contain ClearCase Projects |
| |
Summary:
Created versioned object
base.
Host-local path: ntwkst01:C:\ClearCase_Storage\VOBs\PVOB.vbs
Global path: \\ntwkst01\ccstg_c\VOBs\PVOB.vbs
VOB ownership:
owner MHELVINA\abarrett
group MHELVINA\Domain Users VOBs
have special data backup considerations. For more information
on how to
back up your VOB properly, see the documentation for administering
ClearCase.
If the backups aren't done properly, you are putting your
data at risk!Mounting MVFS filesystem \PVOB.
|
Taking
Control
| |
- |
Case
Insensitive MVFS |
| |
- |
Create
a project VOB |
| Next > |
- |
Create
a component |
| |
- |
Create
a project |
Create
a Component
A Component is a VOB which contains your project files (Uniface
source code etc)
In order to import your Uniface source code, the component
must be created following these steps:
-
Create a VOB
-
Import Uniface source code
-
Convert VOB to a component (see Create a project)
Planning for one or more VOB's
As described by Rational in the ClearCase documentation, performance
of your VOB server may be reduced if the VOB is too large
in size. If you are concerned about the size that your VOB's
are or may become, consider:
-
Splitting your Uniface application models, and forms up
into smaller 'projects', and store them in separate VOB's.
Note: This will mean that from a single Uniface IDF session,
only these elements can be seen, so this is NOT a solution
for a system that has shared components.
-
Create several VOB's, one for tables, sub-types, relationships,
one for components, one for globals and templates. Then use
VOB symbolic links to make these appear to be a single VOB
to UD6/CMtool Driver. Note: This is a good solution for
Uniface development sites that use a lot of shared components
or models.
The example described here uses a single VOB to store all
the source code.
Create
a Windows NT directory share
Log on to the VOB host and create, and then share (standard
Windows NT share) a directory called uprjvob. In our example
we have used c:\vobuprj, with a share name of \\ntwkst01\uprjvob.
Create
a Versioned Object Base
Follow the instructions in the Rational ClearCase Administration
Manual (10.3) for creating a VOB. A general overview is given
here.
Choose
a VOB-tag, we used the name '\uprj'.
Create
the VOB, using cleartool or a GUI tool like Clear Case Home
Base, e.g.:.
Press
Create VOB.
Enter
these details:
Name: UPRJ1
Create VOB as UCM component: No
Description: Uniface Project Database
This VOB will also store: none
Press Next.
Select a storage location (the default was used in our example).
Press
Finish.
| |
VOB
Tag Information:
Tag name: UPRJ1
Region name: evaluation_region
Comment:
Uniface Project Database
VOB Storage Information:
VOB storage location:
\\ntwkst01\ccstg_c\VOBs\UPRJ1.vbs
Features:
+No administration VOB will be associated
with this VOB
+WILL NOT use interoperability (MS-DOS) text mode
+WILL be reconnected at login
+WILL contain ClearCase elements |
| |
Summary:
Created versioned object
base.
Host-local path: ntwkst01:C:\ClearCase_Storage\VOBs\UPRJ1.vbs
Global path: \\ntwkst01\ccstg_c\VOBs\UPRJ1.vbs
VOB ownership:
owner MHELVINA\abarrett
group MHELVINA\Domain Users
VOBs have special data backup considerations. For more
information on how to
back up your VOB properly, see the documentation for administering
ClearCase.
If the backups aren't done properly, you are putting your
data at risk!
Mounting MVFS filesystem \UPRJ1.
|
Create a temporary view for importing the cvt_data
To import the cvt_data file (created earlier), a view must
exist for this VOB. We will create a permanent integration
view later when the VOB is imported to the UCM project.
To
create the view either use cleartool mkview, or ClearCase
Home Base (select the Views property page):
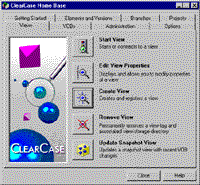
Press
Create View. Then press Next.
Select
Dynamic View.
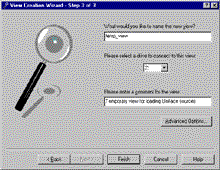
Enter
these details:
name: temp_view
drive: Z:
description: Temporary view for loading Uniface sources
Press Finish.
Press OK to the confirmation(s).
Import
the cvt_data to the VOB
Your Uniface application source code has already been loaded
into text files (in XML format) by the UD6/CMtool Driver,
and stored on c: drive (we used the directory c:\cc). These
next tasks copy these files into a ClearCase import format,
then import them into ClearCase.
Use
the ClearCase tool clearimport to load the file cvt_data created
in the earlier step, to a view created on drive z:.
C:\cc\sources> |
z: |
Z:\> |
cd
UPRJ1 |
Z:\UPRJ> |
clearimport
-pcase c:\cc\sources\cvt_data |
Label the imported elements ORIGINAL.
In
order to be able to identify these files in a baseline, we
will now label all the directory and file elements loaded
as ORIGINAL.
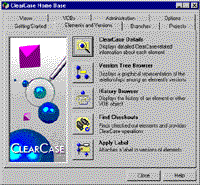
Using
ClearCase Home Base, select the Elements and Versions tab,
and then press Apply Label.
Apply
the label to the view temp_view.
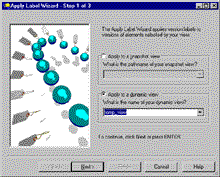
Press
Next.
Add
the directory UPRJ1 as the element to apply the label to.
Press Next.
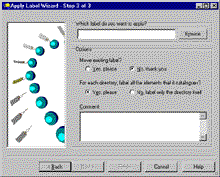
Enter
the following details:
Which label: ORIGINAL (press Browse, Create Label Type, Name:
ORIGINAL, OK, OK)
Move existing: No
Label all elements: Yes
Comment: Files loaded into UD6/CMtool Driver
Press
Finish.
| |
Destination
view:temp_view
Label to apply: ORIGINAL
Options:
+ For each directory, label all the elements that it catalogues
Elements to apply label to:
\UPRJ1
Comment:
Files loaded into UD6/CMtool Driver |
Press
OK to the confirmation(s).
Answer
No when you are prompted to apply another label..
Remove
the temporary view
Remove use temporary view by using ClearCase Home Base, Remove
View..
Taking
Control
| |
- |
Case
Insensitive MVFS |
| |
- |
Create
a project VOB |
| |
- |
Create
a component |
| Next > |
- |
Create
a project |
Create
a Project
Create the Project, using cleartool or a GUI tool like Clear
Case Home Base, e.g.:.
Press
Project Explorer.
The
left pane should show the root folder of all UCM VOBs (i.e.:
UCM). IF it does not, try selecting Show All Project VOBs
from the View pulldown menu.
Select
the folder UCM from the left pane, then right click on the
Components folder from the right pane. Select Import VOB.
Add UPRJ1 to the VOBs to import, then press Import. You should
be given a dialog that states that VOB UPRJ1 was successfully
converted into a component. Select OK to the dialog(s).
Select
the folder UCM from the left pane, then right click on the
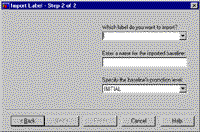
Components folder from the right pane. Select Import Label.
Add UPRJ1 to the Selected Components, then press Next.
Enter
the following details:
Which Label to Import: ORIGINAL
Name for the Baseline: ORIGINAL
Promotion Level: INITIAL
Press
Finish.
Select
the folder UCM from the left pane, then use the pulldown menu
option File, New, Folder to create a folder named Uniface
Sources.
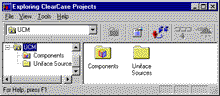
In
the left pane select the folder 'Uniface Source', then choose
the pulldown menu option File, New, Project. The New Project
wizard appears.
Enter
these details:
Title: Reference Uniface Source Code
Description: Initial load of Uniface Source code using UD6/CMtool
Driver
Press
Next.
Select
No (this project will not be based on another), then press
Next.
You
are asked to choose the baselines that will be used. Press
Add.
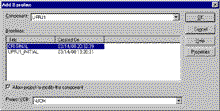
Choose
the ORIGINAL baseline for the component UPRJ1, and ensure
that the Allow project to modify component box is NOT checked,
then press OK. Press Next.
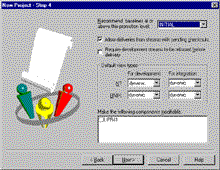
Press
Next.
If
you are using ClearQuest you can enable the ClearQuest integration
at this step. Press Finish.
| |
Project
Information:
Name: Reference Uniface Source
Code
Description:
Initial load of Uniface Source code using UD6/CMtool
Driver
Component Baselines:
UPRJ1 ORIGINAL
Policy:
Recommend latest baselines with
minimum promotion level of INITIAL
Default UNIX development view type: dynamic
Default UNIX integration view type: dynamic
Default NT development view type: dynamic
Default NT integration view type: dynamic
Delivery is allowed from streams with checkouts
ClearQuest Integration:
Project is not ClearQuest-enabled.
|
Create
a View.
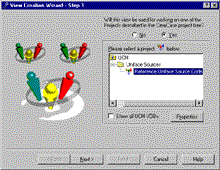
The
create project step creates an integration stream, but in order
to see the source code from a workstation, a read only integration
view must be created. In the left pane of the project explorer,
navigate to the integration stream by moving down the object
hierarchy:
Root
Folder (UCM)
Project Folder (Uniface Sources)
Project (Reference Uniface Source Code)
Stream (Integration)

Using
the Pulldown menu choose File, New, View. The View creation
wizard appears:
Accept
the default values to create an integration view.
Press
Next, then Next again, then enter these details for the integration
view:
Name:
Reference_Uniface_Source_Code_integration
Type: Dynamic
Press
Next, then Finish on the final screen (we used drive letter
Z:).
Press
OK on the confirmation screen(s).
If
you look at the Z: drive using Windows Explorer, it should
contain all your Uniface Source Code in the UD6/CMtool Driver
XML format as read-only files.
Taking
Control
| |
- |
Case
Insensitive MVFS |
| |
- |
Create
a project VOB |
| |
- |
Create
a component |
| |
- |
Create
a project |
ClearCase
& UD6 Guide
| |
- |
Overview
|
| |
- |
Configuration
Information |
| |
- |
Taking
Control in ClearCase |
| Next > |
- |
Releasing
a form using ClearCase |
| |
- |
Checking
a form in using ClearCase |
| |
- |
Adding
a form using ClearCase |
| |
- |
Finding
the difference in versions using ClearCase |
| |
- |
Problems
when using ClearCase |
Releasing
a form using ClearCase
As a way of introducing ClearCase, we are continuing to go
through a typical work-session using it with Uniface and UD6/CMtool
Driver. In the previous section we loaded the current source
into UD6/CMtool and set up a VOB and view in ClearCase to
hold it. Now in this section we will follow the procedures
described in the 'Developing Software with ClearCase' manual,
to check out and modify a form component.
Firstly
familiarise yourself with the ClearCase terms and procedures
described in the 'Developing Software with ClearCase' manual.

With
ClearCase the Uniface developer can choose to either:
- Create
Dynamic views that contain all of the elements that make
up the Uniface Source Code for an application read-only
and the elements the developer is allowed to change as read-write,
or
- ·
Use a Snapshot view that only contains SOME of the elements,
and then use triggers to keep the UD6/'CMtool Driver INUSE
file up to date
We
will only describe the 1st scenario here since it is the more
standard way to work with ClearCase. For examples on trigger
scripts and the INUSE file, please refer to the how to: guide
for eChange Man.
Create
a maintenance project and a developer stream
The Rational ClearCase manual describes the starting point
as Joining a project, however the only project that we have
set up so far, is a read-only project (for accessing the reference
code).
To
create the Maintenance Project, use Clear Case Home Base,
select the Projects tab and press Project Explorer:
Select
the folder UCM from the left pane, then use the pulldown menu
option File, New, Folder to create a folder named Uniface
Maintenance.
In
the left pane select the folder 'Uniface Maintenance', then
choose the pulldown menu option File, New, Project. The New
Project wizard appears
Enter
these details:
Title: Maintain Uniface Application
Description: Maintenance project for existing application
.
Select
No (this project will not be based on another), then press
Next.
Press
Next.
Select
No (this project will not be based on another), then press
Next.
You
are asked to choose the baselines that will be used. Press
Add.
Choose
the ORIGINAL baseline for the component UPRJ1, and ensure
that the Allow project to modify component box IS checked,
then press OK. Press Next, press Next (again) then press Finish.
| |
Project
Information:
Name: Maintain Uniface Application
Description:
Maintenance project for existing application.
Component Baselines:
UPRJ1 ORIGINAL
Policy:
Recommend latest baselines with
minimum promotion level of INITIAL
Default UNIX development view type: dynamic
Default UNIX integration view type: dynamic
Default NT development view type: dynamic
Default NT integration view type: dynamic
Delivery is allowed from streams with checkouts.
ClearQuest Integration:
Project is not ClearQuest-enabled.
|
Join
the Maintenance Project
From ClearCase Home Base, select the Projects tab and press
Join Project.
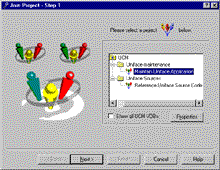
Select
the Uniface Maintenance folder and then the Maintain Uniface
Application project, then press Next.
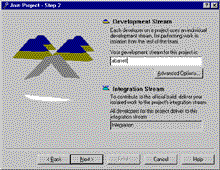
Enter
the development stream name as your username (since we are
using only one project/stream there is no need currently for
more complex names). Press Next.
Enter
the following details:
The name of the Dynamic view as your username
The name of the Integration view as Maintain_Uniface_Application_integration
.
Press
Next.
We
chose a drive letter of Y for the development view, Press
Next.
We
chose a drive letter of X for the integration view. Press
Finish..
Select
OK on the Confirmation screen(s).
Update
the UD6/CMtool Driver configuration files
- Alter
the default directory for the IDF shortcut from c:\cc to
y:\ (the development view
-
Alter the ASN file to direct the 'catchall' to .\uprj1\other\*.*
-
Alter the Joins file to refer to .\uprj1 instead of .\sources
Files
not checked out cannot be altered
Start
the IDF using the shortcut. Open a form component and make
a change and then press Store (or File, Store). The following
error should be presented.
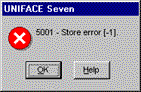
In
order for any Uniface source code to be modified, it must
be first checked out. Choose File Quit instead.
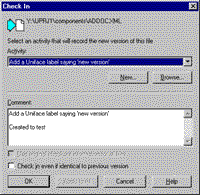
Check
out a Form Component
Use
Windows Explorer to navigate to the file:
Y:\Uprj1\components\component-name.XML:
Use
the right mouse menu to select ClearCase, Check Out…
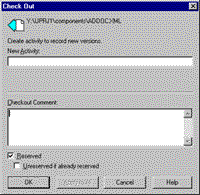
Enter
the following details:
|
New Activity: |
Add
a Uniface label saying 'new version' |
|
Checkout Comment |
Add
a Uniface label saying 'new version'
Created to test |
Press OK.
Files checked out can be altered
Open
the form component (it may now appear at the END of the component
listing) and make a change and then press Store (or File,
Store). The store should be successful.
ClearCase
& UD6 Guide
| |
- |
Overview
|
| |
- |
Configuration
Information |
| |
- |
Taking
Control in ClearCase |
| |
- |
Releasing
a form using ClearCase |
| Next > |
- |
Checking
a form in using ClearCase |
| |
- |
Adding
a form using ClearCase |
| |
- |
Finding
the difference in versions using ClearCase |
| |
- |
Problems
when using ClearCase |
Checking
a form in using ClearCase
As
a way of introducing ClearCase, we are continuing to go through
a typical work-session using it with Uniface and UD6/CMtool
Driver. In the previous section we checked out a form component.
Now in this section we will follow the procedures described
in the 'Developing Software with ClearCase' manual, to check
in a modified form component.
Firstly
familiarise yourself with the ClearCase terms and procedures
described in the 'Developing Software with ClearCase' manual.
Now
that we have checked out the form component, you may make
changes to it (remember that the source files not checked
out are read-only). Add a comment to the form that you checked
out earlier.
Using
ClearCase you can return source code files individually, or
as a group. To return all checked out files, use the Windows
explorer to navigate to y:\Uprj1 then use the right mouse
menu to select ClearCase, Find Checkouts.
To
return just this source to ClearCase, open the Windows Explorer,
and navigate to:
Y:\Uprj1\components\component-name.XML:
Use
the right mouse menu to select ClearCase, Check In…
Press
OK.
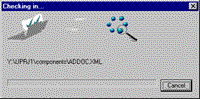
The source code for this Uniface form component has now been
returned to source code control in ClearCase.
Start
the IDF, and edit one the components that you 'checked in'.
When you attempt to STORE your changes, you should be presented
with a message similar to:.
Delivering your work area
Even
though the Uniface Form Component has been checked back in,
it is not yet available for other developers to 'see'. For
this to happen you must deliver your activities, and the ClearCase
administrator may need to re-base the integration view.
To
deliver your work area, use Windows explorer to navigate to
the root folder of the developer view, e.g.: Y:\. From the
right-click menu select Deliver from Stream.

Press
OK.

ClearCase
now delivers the altered code to the integration stream.

Close
the confirmation dialog (with or without the 'Open explorer'
option.
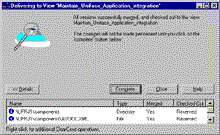
Complete
the delivery by pressing Complete.
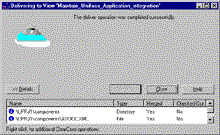
Once
ClearCase has completed the delivery, press Close.
Other
developers or testers can now see your changes from the Integration
View.
See
the Rational ClearCase documentation for details on how to
create a new baseline and how to Rebase a Developers View:
ClearCase
& UD6 Guide
| |
- |
Overview
|
| |
- |
Configuration
Information |
| |
- |
Taking
Control in ClearCase |
| |
- |
Releasing
a form using ClearCase |
| |
- |
Checking
a form in using ClearCase |
| Next > |
- |
Adding
a form using ClearCase |
| |
- |
Finding
the difference in versions using ClearCase |
| |
- |
Problems
when using ClearCase |
Adding
a form using ClearCase
Creating
a brand new form / service / report that has never existed
before is a special case in a Configuration Managed environment.
This also applies to a new table / sub-type / library etc,
but not a new register, field etc since these exist 'within'
an existing entity (file).
Provided
that you have already created a ClearCase developer view,
you can create the new Uniface form component in the usual
manner from the IDF.
To
load it into the ClearCase repository, open the Windows Explorer,
and navigate to:
Y:\Uprj1\components\new-component-name.XML:
Use
the right mouse menu to select ClearCase, Add to Source Control…
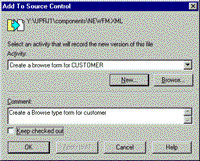
In
our example we created a new activity, and deactivated the
'Keep checked out' option.
Press
OK.
The
form will now be checked in as described previously.
ClearCase
& UD6 Guide
| |
- |
Overview
|
| |
- |
Configuration
Information |
| |
- |
Taking
Control in ClearCase |
| |
- |
Releasing
a form using ClearCase |
| |
- |
Checking
a form in using ClearCase |
| |
- |
Adding
a form using ClearCase |
| Next > |
- |
Finding
the difference in versions using ClearCase |
| |
- |
Problems
when using ClearCase |
Finding
the difference in versions using ClearCase
One
of the most powerful features of a CM tool is it allows you
to find out WHO made WHAT change. ClearCase includes a powerful
XML diff/merge function to assist with this task.
To
get to the "XML Diff Merge" window, select a file
using the Windows Explorer, then use the right mouse menu
to choose the ClearCase-> Compare with Previous Version
option:

The
XML Diff/Merge window is displayed. Since the ClearCase diff
tool understands XML, it makes if very easy to find changes.
Consult
the ClearCase reference manual for further information.
ClearCase
& UD6 Guide
| |
- |
Overview
|
| |
- |
Configuration
Information |
| |
- |
Taking
Control in ClearCase |
| |
- |
Releasing
a form using ClearCase |
| |
- |
Checking
a form in using ClearCase |
| |
- |
Adding
a form using ClearCase |
| |
- |
Finding
the difference in versions using ClearCase |
| Next > |
- |
Problems
when using ClearCase |
Problems
when using ClearCase
Issues
with MVFS
March Hare recommend that users of ClearCase follow Rational's
guidelines for Case Sensitivity as described in the Clear
Case Administration Manual Section 5.2.
|

