Step by Step guide to using UD6/CMtool Driver with PVCS Version
Manager
PVCS is a popular commercial source
code management tool for Windows and Unix environments. It offers
basic of support for CM, using SCCS-like commands, and is considered
most appropriate for small development projects. Examples given
in this section are for PVCS Version Manager 6.5.
The home of PVCS on the web is http://www.merant.com
A complete list of configuration management tools can be found
at http://www.iac.honeywell.com/Pub/Tech/CM/CMTools.html
If you have not already done so, please read A
methodology to Uniface source code control before you continue
with these topics and examples.
Configuration Information
The PVCS Version Manager is a client only type SCM tool, which
can run on multiple platforms. NT shares or SAMBA shares can be
used to distribute the controlled files across a network. PVCS also
has a VM server, which can be used in a server based environment.
The setup is almost identical for the two products, except that
with the server based product some of the NT share or samba share
techniques discussed in the section on how to use UD6/CMtool Driver
with eChange Man would have to be used.
These examples are all using the Win32 based PVCS Version Manager.
- Install PVCS Version Manager according to the installation
guide provided with it.
- Create a shared network directory (eg: on an NT server) for
the work files. This will be the place that you create the initial
load of source code, and in future where source code that is 'checked
out' will reside.
- Share the created directory as 'workfiles', allowing full read-write
access.
- Connect a drive on an NT Workstation to the NT share 'workfiles'
(we have used drive M:)
For the purposes of the demonstration at this point, the default
directory of the shortcut used to start the IDF should be m:\
(the drive where the sources have been loaded).
- Install PVCS Version Manager on this workstation if it has
not been done so far. (It is possible to install PVCS Version
Manager on a shared file system, but it must be individually installed
to each workstation).
- Install Uniface and UD6/CMtool Driver on to the NT Workstation.
- Alter the usys.ini and usys.asn files as per the Guide to Installing
UD6/CMtool driver.
- Alter the Joins File (in the Uniface bin directory) to locate
the source code on drive M:
- Alter the usys.asn file to have a 'catchall' to direct all
non-joined source code to drive M:, set the $MAXFILES and set
temporary files to be stored in another database.
- Start and then close the IDF to initialise an empty repository.
(For the purposes of the demonstration at this point, the default
directory of the shortcut used to start the IDF should be m:\
(the drive where the sources have been loaded). The file m:\sources\other\udicver.xml
now exists.
- Add the 'nokeycheck' parameter to the USYS$UD6_PARAMS setting
in the usys.asn file (this setting improves the performance of
the UD6 driver for bulk load operations, but must be disabled
for normal use).
- Load the repository from a backup with a command like:
idf /com=100 /cpy trx:7204bkp07Feb2000.trx idf:
(some unix environments may require the /com=10 switch to reduce
the number of file handles used).
- Alter the usys.asn file to remove the 'nokeycheck' parameter.
Configuration Files - Joins File
The Joins file was:
UFORM:ULABEL:ULABEL::.\sources\components\*
UXGROUP:UFORM:ULABEL,UBASE::UFORM
UXFIELD:UFORM:ULABEL,GRP,UBASE::UFORM
UXREGS:U_FORMLIB:U_NAME::UFORM
UCTABLE:U_VLAB,U_TLAB:U_VLAB,U_TLAB::.\sources\tables\*
UCKEY:U_VLAB,U_TLAB:U_TLAB,U_KSEQ::UCTABLE
UCFIELD:U_VLAB,U_TLAB:U_FLAB::UCTABLE
UCGROUP:U_GLAB,U_VLAB:U_GLAB,U_VLAB::.\sources\sub-types\*
UCRELSH:U_GLAB,U_VLAB,U_RGLAB:U_GLAB,U_VLAB,U_RGLAB::.\sources\relationships\*
USOURCE:USUB!UVAR,ULAN:USUB,UVAR,ULAN::.\sources\globals\*
UAPPL:ULABEL:ULABEL::.\sources\applications\*
UAPLFRM:ULABEL:ULABEL,UFORM::UAPPL
USIMPL:UIMPLNAM:UIMPLNAM::UFORM
USILINK:UIMPLNAMCAL:::USIMPL
USIMPKW:UIMPLNAM:::USIMPL
USIOPER:UIMPLNAM:::USIMPL
USIPARM:UIMPLNAM:::USIMPL
USSPEC:USPECNAM:USPECNAM::UFORM
USLINK:USPECNAMCAL:::USSPEC
USOPER:USPECNAM:::USSPEC
USSPCKW:USPECNAM:::USSPEC
USPARM:USPECNAM:::USSPEC
USMENU:UMENU,UVAR,ULAN:UMENU,UVAR,ULAN::.\sources\menus\*
USITEM:UMENU,UVAR,ULAN:UMENU,UVAR,ULAN,UTECHSEQ::USMENU
UGREGS:U_FORMLIB:U_FORMLIB,U_NAME::.\sources\registers\*
USICPLB:UTLBNAM:UTLBNAM::.\sources\type-libraries\*
USILBCP:UTLBNAM:UTLBNAM::USICPLB
USILBSS:UTLBNAM:UTLBNAM::USICPLB
UGGIF:U_MLAB:U_MLAB::.\sources\templates\entity-interface\*
UGFIF:U_MLAB:U_MLAB::.\sources\templates\field-interface\*
UGFLAY:U_MLAB:U_MLAB::.\sources\templates\field-layout\*
UGFSYN:U_MLAB:U_MLAB::.\sources\templates\field-syntax\*
UTPLFLD:TEMPLATENAME:TEMPLATENAME::.\sources\templates\field\*
UTPLFRM:TEMPLATENAME:TEMPLATENAME::.\sources\templates\component\*
UTPLGRP:TEMPLATENAME:TEMPLATENAME::.\sources\templates\entity\*
USUBS:SUBSYSTEM:SUBSYSTEM::.\sources\subsystems\*
UGLYPH:UCSUB,UCLABEL,UCVAR:UCSUB,UCLABEL,UCVAR::.\sources\glyphs\*
For the purposes of this demonstration, the
default directory of the shortcut used to start the IDF should be
m:\ (the drive where the sources have been loaded).
Configuration Files - ASN File
An assignment file was set up to redirect the other entities, as
follows:
[SETTINGS]
$language=USA
$enhanced_edit=all
$search_object=file_first
$MAXFILES=2046
[FILES]
usys:idf.aps usys:..\ud\idf.aps
usys:ur*.svc usys:..\ud\ur*.svc
usys:uu*.svc usys:..\ud\uu*.svc
usys:uu*.frm usys:..\ud\uu*.frm
usys:uv*.frm usys:..\ud\uv*.frm
usys:idf*.frm usys:..\ud\idf*.frm
usys:pv*.frm usys:..\ud\PV*.frm
usys:usys*.frm usys:usys*.frm
usys:*.dis usys:*.dis
usys:*.dsc usys:*.dsc
usys:*.trx usys:..\trx\*.trx
usys:udbg.aps usys:udbg.aps
udbg:udbg*.frm usys:udbg*.frm
gpm.aps usys:..\usys\gpm.aps
*.frm usys:..\project\*.frm
*.svc usys:..\project\*.svc
*.rpt usys:..\project\*.rpt
*.aps usys:..\project\*.aps
[PATHS]
$ud6=ud6:
$DEF=$DB3
$UUU=$DB3
$IDF=$ud6
$SYS=$DB3
[ENTITIES]
;
; Dont store temporary data in XML
USTMP.DICT $uuu:usys:..\project\USTMP.*
ULANA.DICT $uuu:usys:..\project\ULANA.*
*.sysenv usys:*.*
*.dict $ud6:\sources\other\*.*
[WIDGETS]
[LOGICALS]
[SERVICES_EXEC]
[REPORTS_EXEC]
[DRIVER_SETTINGS]
USYS$UD6_PARAMS=listdir m:\inuse, nokeycheck
[TM]
;MANAGER = ...
;PATHS = ...
;TIMEOUT=0
;TXRETURNPHASE=2
This will work regardless of what the current working directory
is. Alternatively it is possible to make the file specifications
relative to the current working directory. The added lines and altered
sections are shown in BLACK and the lines that already existed in
the default asn file are shown in GREY. For the purposes of this
demonstration, the default directory of the shortcut used to start
the IDF should be m:\ (the drive where the sources have been loaded).
The nokeycheck parameter must be removed
after doing the initial repository load, otherwise the driver will
not work correctly.
This assignment file assumes that only the Uniface source code
is being stored using UD6/CMtool Driver, not temporary records,
or 'compiled' source (e.g.: UOBJ).
WARNING: If you have a USYS$UD6_PARAMS specified
in both a local ASN file and the usys.asn file, the settings in
the usys.asn file override the local assignment file.
Taking Control
As a way of introducing PVCS Version Manager, we'll go through
a typical work-session using it. . The first thing to understand
is that PVCS Version Manager stores all files in archives, and any
files that are 'checked out', in a workfile area.
Before continuing, ensure that the nokeycheck parameter has been
removed from the USYS$UD6_PARAMS setting in the assignment file,
otherwise the driver will not work correctly.
Prior to loading your source into PVCS Version Manager, it is wise
to compile all objects and forms, eg:
$idf /all
This ensures that all the descriptors have been generated for the
forms. Without this information you will not be able to compile
forms in the CM tool since they will be read-only and the descriptors
cannot be generated (see the nodeny parameter in the USYS$UD6_PARAMS
help topic).
For the same reasons you may wish to start up the IDF and select
the Assembly Area, then the Assembly Workbench.
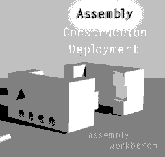
Clicking on this ICON will start the initial synchronisation of
signatures and diagram.
Taking Control - Create and load a project
Once you have created your workfiles (Uniface source code) on drive
M:, it's time to prepare a place for PVCS Version Manager to keep
the archives of the current and past versions of the source code.
PVCS calls this archives area the project database. Once the project
database is created It will then be possible to create an initial
load of all the workfiles into it.
Create a shared network directory (eg: on an NT server) for the
project database. Share the created directory as 'project_database',
allowing full read-write access. Create a directory on this share
called 'reference'. This is where the 'read-only' copy of the sources
will be kept. Please see A methodology to
Uniface source code control for more information.
You can now create a new project database by choosing Create New
Project Database from the Admin pulldown menu in PVCS Version Manager.
Create Project Database
Name: BridalDatabase
Location: N:
Archive Location: N:\archives
Workfile Location: M:\sources
Pressing OK will create an empty project database.
Then select the BridalDatabase (N:) from the tree, and choose Configure
Project Database from the Admin pulldown menu.
Create Project Database - BridalDatabase
General - Workfiles
Attributes
After Check In: Delete workfile
Keyword Expansion
Path Separator: Backward Slash (\)
Reference Directory
Reference Directory: C:\reference
Keep a reference directory
for each archive directory YES
Make reference files
read-only YES
File Types
[xml] - add this using the "add new file
type" button
Store Deltas: YES
Translate EOL YES
[gif] - add this using the "add new file
type" button
Store Deltas: NO
Translate EOL NO
[css] - add this using the "add new file
type" button
Store Deltas: YES
Translate EOL YES
[xsl] - add this using the "add new file
type" button
Store Deltas: YES
Translate EOL YES
Pressing OK will update the project database configuration.
Now to perform an initial load of all the source code into the
created Project Database, choose File ->Add Workfiles from the
pulldown menu. A screen should appear with the default workfile
location of m:\sources\*.*, select OK.
Add Workfiles to BridalDatabase
Description: Bridal Registry
Use description for all: YES
Show warning if versioned file already exists: YES
Workfiles: Use existing workfile location
Delete workfile after checkin: YES
Include workfiles in subdirectories: YES
Pressing OK will load the project database with the source code
you have imported with UD6/CMtool Driver in a previous step. When
this is completed PVCS Version Manager will display a message stating
that the "Action completed successfully".
Finish taking control
Once you have created a project database, configured it for UD6/CMtool
Driver XML files and reference directory, and loaded the workfiles,
you are ready perform the final steps to allow Uniface, the UD6/CMtool
Driver and PVCS Version Manager to work together.
In these final steps you will:
- Perform cleanup activities from creating the project database
- Configure the IDF shortcut
- Alter the usys.asn and joins file (in
the Uniface bin directory) to refer to .\reference wherever it
currently refers to .\sources
- Configure PVCS Version Manager to update the INUSE file when
files are checked in or out by using the Event Triggers
Post project database creation
cleanup
The loading of the workfiles into the project database
in the previous step should have left tne M:\drive empty (apart
from empty directories). The empty directories can all be removed
at this point and PVCS Version Manager will re-create them when
necessary through the process of checking out files.
Configure the IDf shortcut
Modify the IDF shortcut to have its default working directory
(Start in:) as N:\
Configure the USYS.ASN
and JOINS files
The usys.asn exists in the
Uniface usys directory and the JOINS file in the Uniface bin directory.
Wherever these files refer to .\sources they need to be modified
to refer to .\reference.
Configure Event Triggers in
PVCS Version Manager
PVCS Version Manager can call the UD6/CMtool Driver programs
add2list.exe and del2list.exe to automatically update the INUSE
file. Firstly you have to make a batch file for the checkout script
(because of a limitation in PVCS Version Manager 6.5 does not allow
the same command line macro twice).
Here is the batch file we created in c:\utest\ntu7205\bin\checkout.bat
@echo off
c:\utest\ntu7205\bin\add2list.exe -rM:\sources %1 .\reference%2
m:\sources%2
Using PVCS Version Manager, select BridalDatabase in the tree,
and then Admin ->Configure Project from the pulldown menu.
Configure Project Database -
BridalDatabase
PVCS Version Manager can call the UD6/CMtool Driver programs
add2list.exe and del2list.exe to automatically update the INUSE
file. Firstly you have to make a batch file for the checkout script
(because of a limitation in PVCS Version Manager 6.5 does not allow
the same command line macro twice).
Event Triggers
Check in
After: c:\utest\ntu7205\bin\del2list.exe -rM:\
m:\inuse m:\__EventFQPWorkfile__
Check Out/Get
After: c:\utest\ntu7205\bin\checkout.bat m:\inuse
__EventFQPWorkfile__
Releasing a form
As a way of introducing PVCS Version Manager, we are continuing
to go through a typical work-session using it with Uniface and UD6/CMtool
Driver. In the previous section we loaded the current source into
UD6/CMtool and set up a project database, workfiles, and reference
area and set PVCS Version Manager to control it. Now in this section
we will check out a form component.
Firstly you need to log into the PVCS Version Manager as whoever
has access to check out files from the project.
From the main screen open up the My Project Databases tree, then
the project database that you have loaded the workfiles into (our
example uses BrdalDatabase). When you find the components directory,
open it to find a form component to check out. You can select Check
Out by right clicking with the mouse on the files icon. You may
be prompted for a Check Out To area, the default should be similar
to: M:\sources\components\BRD010.XML , accept this by pressing OK
If you set up users and groups in PVCS version manager you could
write scripts that use different INUSE files (eg: m:\dev-team-1.inuse,
m:\dev-team-2.inuse) for different developers (or groups) with
the command line macro __EventUserID__. This would then allow
different teams to work independent of each other, neither seeing
the others changes until they are 'committed'. Developers can
even switch 'views' by switching INUSE files on the fly by typing
the LISTDIR command into the SQL workbench.
In the background, the script that you specified in an earlier
step will run, placing the details that the file has been 'checked
out' into the INUSE file.
When you examine the M: drive, you will see a file called 'inuse'.
This is like a mini joins file for the UD6/CMtool Driver, it specifies
the exceptions to the rules you set up in the joins file. The inuse
file typically contains 1 line for every 'checked out' file.
Ensure that your usys.asn file includes the 'listdir' setting in
USYS$UD6_PARAMS, eg:
[DRIVER_SETTINGS]
USYS$UD6_PARAMS=listdir n:\inuse
Start the IDF, and edit one of the components that you 'checked
out'. You should be able to make changes and store them successfully.
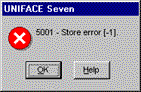
Now edit a component that you did NOT check out. When you attempt
to STORE your changes, you should be presented with a message similar
to:
If you wish to, you can press OK, and then close the component
without saving, switch back to PVCS Version Manager and check out
this component. You now should be able to re-open the component
and make changes and store them..
Checking a form in
Now that we have our new copy of the form, you may make changes
to it (remember that the source files in the reference area are
read-only). Add a comment to the form that you checked out earlier.
To put this source back into the PVCS Version manager project database
you need to log into the PVCS Version Manager as whoever has access
to check files in.
From the main screen open up the My Project Databases tree, then
the project database that you have loaded the workfiles into (our
example uses BrdalDatabase). When you find the components directory,
open it to find the form component that you checked out. You can
select Check In by right clicking with the mouse on the files icon.
You may be prompted for a Check In description, enter this, and
ensure that Delete file after check in is set ON, then accept it
by pressing OK.
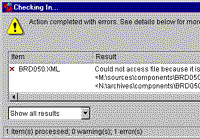
PVCS may give an error because UD6/CMtool driver has cached a read-only
open connection to the file.
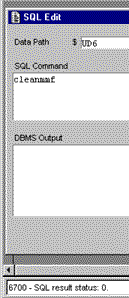
To resolve this, use the SQL workbench function from the Uniface
IDF to send the CLEANMMF command (data path UD6) to the UD6/CMtool
Driver. This will close all currently cached file connections.
Once this step is completed you should be able to check the file
into PVCS Version Manager as described above. If the problem persists,
it is probably due to the IDF not having committed the changes correctly
to the UD6/CMtool driver. In this case, open a different form, then
perform the CMEANMMF command from the SQL workbench again.
Start the IDF, and edit one the components that you 'checked in'.
When you attempt to STORE your changes, you should be presented
with a message similar to:
Adding a form
Creating a brand new form / service / report that has never existed
before is a special case in a Configuration Managed environment.
When Uniface is using the UD6/CMtool Driver it will always assume
that if a 'file' does not exist in the 'reference area', then it
does not exist.
This also applies to a new table / sub-type / library etc, but
not a new register, field etc since these exist 'within' an existing
entity (file).
So the easiest way to create a new form, is to copy an existing
form file, remove its contents apart from the header and footer,
check it in to PVCS Version Manager and then check it out and use
it as normal.
e.g.:
m:\sources\components\New.xml contains::
<?xml version="1.0"?>
<?xml-stylesheet href="components.xsl" type="text/xsl"?>
<?xml-stylesheet href="components.css" type="text/css"?>
<uniface_schema xmlns:html="http://www.w3.org/TR/REC-html40">
</uniface_schema>
To put this source into the PVCS Version Manager project database
you need to log into PVCS Version Manager as whoever has access
to check in and create a new workfile.
From the main screen open up the My Project Databases tree, then
the project database that you have loaded the workfiles into (our
example uses BrdalDatabase). When you find the components directory.
Select File ->Add Workfiles from the pulldown menu, and then
select the file new.xml.
You may be prompted for a Check In description, enter this, and
ensure that Delete file after check in is set ON, then accept it
by pressing OK.
The form can now be checked out and worked on as described previously.
NOTE: Even though there is an XML file, since
it is empty of any data, the IDF will not show that the 'FORM' exists.
Once the XML file is checked out, you can create the 'FORM' in the
usual manner in the IDF.
Finding the differences in versions
One of the most powerful features of a CM tool is it allows you
to find out WHO made WHAT change. PVCS Version Manager includes
a diff function to assist with this task.
To get to the "Merge Tool" window, select a file in the
project database, from the right click menu select 'Show Differences'.
You can compare the current workfile, to a version in the archive,
or two archived versions. Once you have made your selection and
pressed OK the "Merge Tool" Window is displayed showing
differences line by line.
Consult the PVCS Version Manager reference manual for further information
Problems when using PVCS Version Manager
When testng UD6/CMtool Driver with PVCS Version Manager the following
problems were observed, that we were unable to find reference to
in the associated manuals.
- Event Triggers only support the use of a single command line
macro, once per trigger (ie: cannot use the same command line
macro several times in the one trigger). This is worked around
using a shell script (unix) or batch file (windows).
- A file cannot be checked in if it is open, even if it is only
open for read-only access. Since UD6/CMtool driver contains considerable
caching mechanisms to improve performance, PVCS often gives an
error, if a file is being checked in shortly after it was worked
on, or where the developers PC has remained inactive for some
time since (but still logged into the IDF). March Hare do not
consider this a major problem, because the developer can use the
CLEANMMF command from the SQL workbench (data path UD6). This
will release all the unused file handles.
If the problem persists, it is probably due to the IDF not having
committed the changes correctly to the UD6/CMtool driver. In this
case, open a different form, then perform the CLEANMMF command
from the SQL workbench again.
- If you double click on an XML file PVCS Version manager offers
to check it out to the temp directory, and may open up IE5 to
display the file. Unfortunately since it copies the file to the
TEMP directory to display it, IE5 cannot find the references to
the stylesheet so it fails to display it.
To resolve this issue, select the XSL file (e.g.: components.xsl),
then the ud6logo.gif file, then the file that you wish to view.
This copies the stylesheet to the temp directory as well.
| 
